
As mentioned in the last blog post I wrote, my spare time lately has been filled with a big kitchen reno my family has been doing. Interior design is a hobby of mine, so I had a lot of fun with this. Once upon a time, I considered trying to become a pro designer, even started an at-home course for it, but eventually realized that I only really enjoy interior design when I’m doing my own interior, to my own taste. :) So hobby it is.
After months of work (mostly on weekends, so it’s been stretched out), we have DIYed ourselves a pretty nice-looking kitchen for about 1/10 the cost of those renos you see on HGTV all the time. In other words, instead of spending $30,000 – $50,000, we did everything for between $3000-$4000. Not too shabby. Granted, we saved a big chunk of money by not getting new appliances, but our current appliances work just fine. I love HGTV, but after a while it gets tiring to watch show after show talking about how every kitchen HAS TO HAVE granite counters and stainless steel appliances. Sorry, but that’s just silly. Your kitchen can look nice without them. Sure stainless would look nice with what we’ve done, but it’s not worth the added expense just to be more matchy.
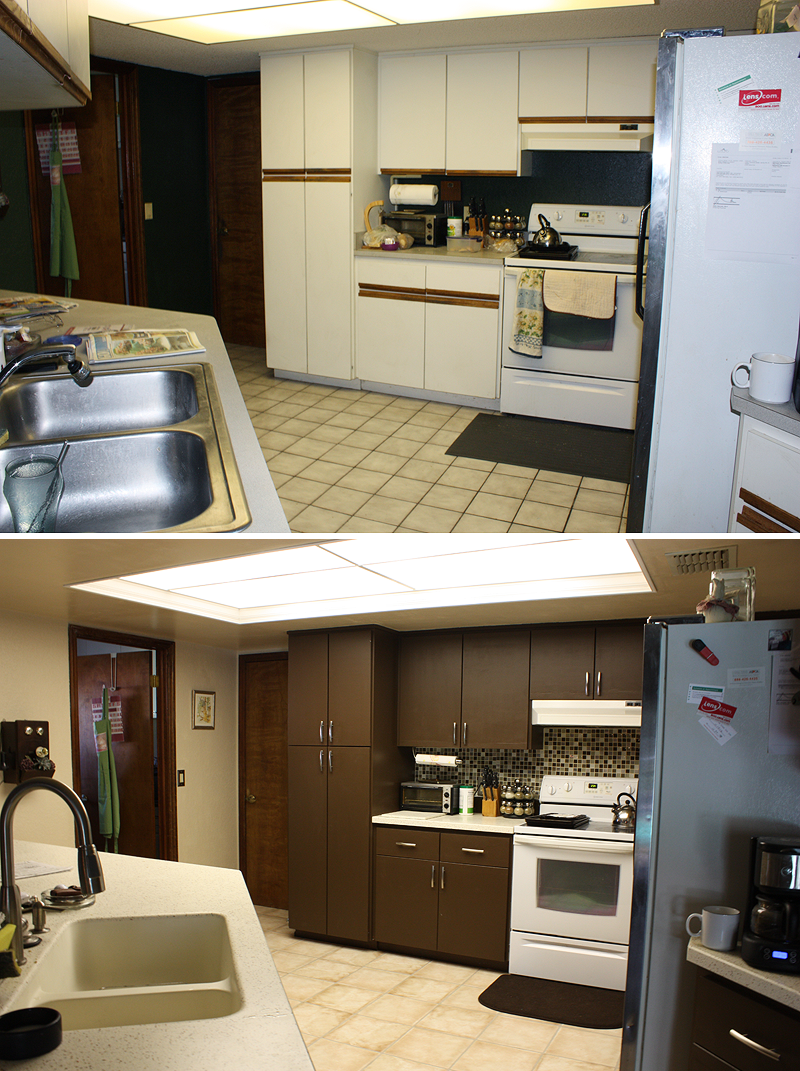
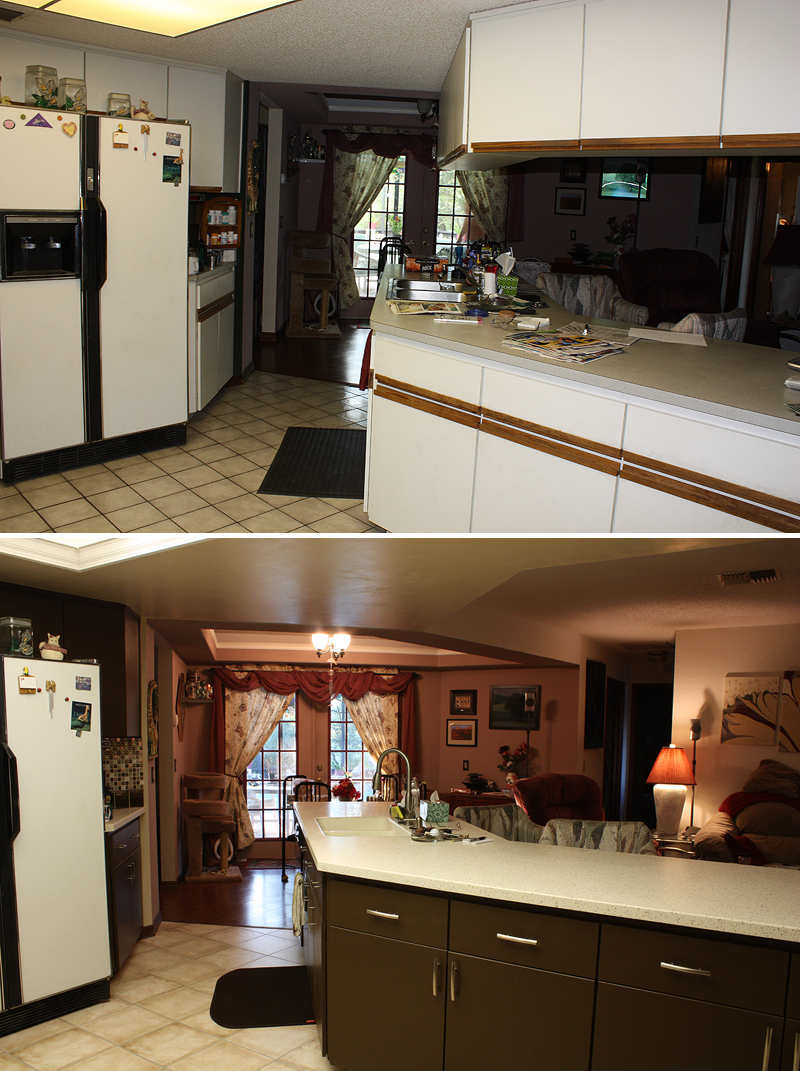
Some before-and-after shots, because photography is another hobby and I couldn’t resist snapping a lot of photos. (click each for a bigger view)

For those interested, here’s what we did:
New paint on the walls and ceiling. (After scraping off the horrific popcorn. I’m not sure we’ll ever attempt THAT again.) That alone made a big difference, given the dark green we used to have on the walls. Replacing the florescent light fixture wasn’t an option, since it was recessed into the ceiling, so we tweaked it a little by adding moulding around the edges and recessing the plastic light panels some. An inexpensive change, but it looks a lot nicer and makes the ceiling feel a little taller somehow. This is a closer view of it:

Cabinets: The biggest project. We couldn’t afford to replace them, so we refaced them instead. First, we removed the row of uppers over the sink to open the room a little more and clear the view into the living room. We have so many cabinets, we were able to rearrange all our junk into the others with no problem. (We have 39 cabinets total, and that’s after removing the 8 uppers.) The next step was getting rid of those awful wood strips/handles. They were attached with screws and a little glue, so not too hard to get off, but we had to replace them with something because without them, not all the doors covered the entire opening of the cabinets behind them. So we went to Home Depot and found some strips of wood that were nearly the perfect height/depth to match up, cut the lengths to size and screwed them in. There’s a slight line where they meet, but it’s not very obvious unless you look for it, and it was a hell of a lot cheaper than new custom cabinet doors would have been! After that, we primed everything (the doors aren’t wood, but a laminate-covered board), then painted them a dark brown. We’ll probably end up getting some kind of sealer to paint over it though, because we’ve noticed even with the super-sticky primer, the paint chips and scratches pretty easily. New hardware completed the updated look, and the whole thing cost just under $200!
Counters: This was the biggest expense. There isn’t really anything you can do to a laminate counter to make it look better other than replace it. Granite and Quartz are nice, but too pricey, so we found a good sale at Lowe’s on a Formica Solid Surface counter that would update the room without breaking the bank. It’s a nice stone feel, with much less upkeep than granite (no sealing, and if you scratch it, it can be sanded down like new). It looks pretty sharp with the dark cabinets. We chose the Crema Terrazzo color. Here is a closer image of it:

We didn’t have a backsplash before, and it was something I really wanted, so we spent some time comparing what was available. We finally decided on a mosaic pattern we liked and headed off to Home Depot to buy it, but once we got there with our paint swatch from the cabinets and compared the two, it turned out the colors didn’t go together as well as we expected. Luckily, there was another mosaic in stock that ended up being a perfect match. Not only did the browns go well, but there were little stainless steel tiles mixed in that matched nicely to our new cabinet hardware. Here’s a link to the pattern.
Our old kitchen floor was a gray ceramic tile that, at the time the house was built, was probably a premium add-on. It was nice, but over time we’ve gotten pretty sick of it. For one, it’s so hard (I think the builders glued it right to the concrete subfloor rather than lay any kind of barrier underneath to cushion it) that anything you drop shatters on impact. And for another, due to that lack of barrier, as the house has settled over the years, cracks have started to form in it. Between that and general chipping from use, it was looking pretty crappy. Also, gray wasn’t going to go with our new color scheme, so a new floor was needed. Problem was, we didn’t want more hard tile (or the work that would go into removing the current tile), so we found a different kind of flooring at a local surplus store that works really well with our new design. It’s essentially a laminate wood – the kind where the planks lock together and float over a thin foam under… thing. But instead of a wood face, it was designed to look like tiles. You can’t really tell it’s not tile until you walk on it. The real test will be the next time we drop something. By getting this kind of floor, we were able to install it right on top of the tile. Much less work, and with no grouting to deal with, it’ll probably be easier to clean.
So that’s our new kitchen. Now that the work is done, maybe I can get back to editing that damn book…


Paint is great when it comes to changing the theme of a room while on a tight budget. And I love the mosaic pattern of your backsplash. It definitely serves as an additional decorative, durable, and easy-to-clean element in the kitchen. :)
ReplyDeleteRegards,
Alana Geikie
I love how you made your kitchen look great while saving money.
ReplyDelete